Table of contents
The debug screen in Minecraft Java Edition shows your coordinates. Since 1.21.9, it shows only coordinates and performance numbers by default, and the light level and biome that older versions displayed are gone. I pressed every shortcut once. You can turn the missing entries back on in Debug Options, and the game can even show the light level as numbers on nearby blocks. With the light level visible, you can see where monsters might spawn. With F3 + G, you can find slime chunks, the chunks where slimes spawn.
I tested on Windows 11 with Java Edition 26.3, in a Superflat world with Allow Commands turned on, default key bindings and the game language set to Traditional Chinese. The text on the debug screen is English only, while chat messages and option screens follow the game language. The screenshots of the option screen and the death screen in this article show the Traditional Chinese interface, and I give the English names next to them.
Coordinates on the debug screen
Press F3 once to open the debug screen and press it again to close it. The coordinates are in the upper right:
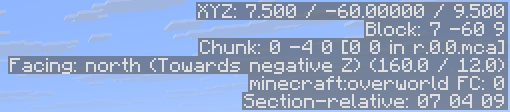
A chunk is an area of 16 × 16 blocks that extends from the bottom of the world to the top. Here is what each line means:
| Entry | Meaning |
|---|---|
XYZ |
The exact coordinates of your feet, in the order X, Y, Z |
Block |
The coordinates of the block under your feet. Use these numbers in commands |
Chunk |
The chunk you are in. The first and third numbers are the chunk’s X and Z |
Facing |
The direction you face. Towards negative Z means Z decreases as you walk forward |
Debug Options
Entries hidden by default can be turned on in “Debug Options” (Minecraft Wiki: Debug screen):
- Hold F3 and press F6 to open “Debug Options”.
- Type the name of an entry in the search box at the top, for example
light. - Change the setting on the right of the entry from “OFF” to “In Overlay” or “Always”, then click “Done”.
An entry set to “In Overlay” appears only while F3 is open. An entry set to “Always” stays on the screen after you close F3. The next screenshot sets both light entries to “Always”. This screenshot shows the Traditional Chinese interface. The search box is labeled “Debug Options”, the red warning is the “These options are for testing purposes only…” text, the headings are “Debug Screen Text” and “Debug Renderers”, and the three buttons on each row are “OFF”, “In Overlay” and “Always”.
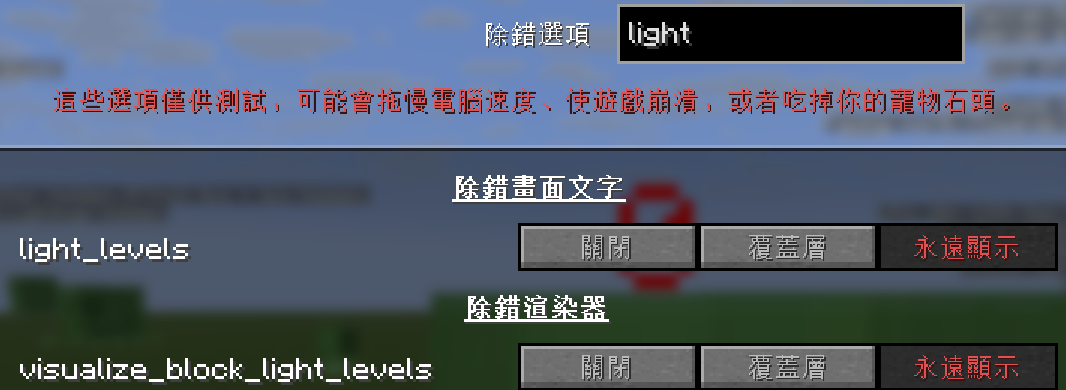
The red warning at the top appears every time. I turned on these two entries and had no problems. If you change a setting by mistake, click “Default profile” at the bottom to restore everything to the defaults.
If the debug screen text is too small, change “GUI Scale” on the same screen, below the list of entries. The game describes this option as “Overrides the debug overlay with a different GUI scale than the rest of the game”.
These are the entries I use most in survival:
| Entry | What it shows once turned on |
|---|---|
light_levels |
The sky light (from the sky) and block light (from torches and other sources) at your feet, for example Client Light: 15 (15 sky, 0 block) |
visualize_block_light_levels |
The block light value drawn on the nearby blocks |
biome |
Your biome, for example Biome: minecraft:plains |
looking_at_block_state |
The coordinates, name and state of the block under your crosshair |
day_count |
The number of days that have passed in the world, for example Day #0 |
Where monsters spawn
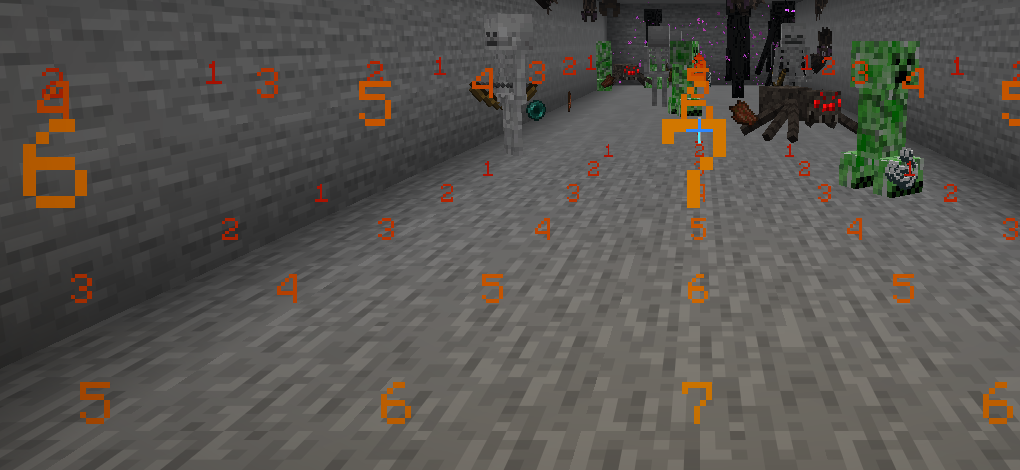
In the Overworld, monsters spawn only where the block light is 0. Block light is the light from sources such as torches and does not include sunlight. If the game shows the block light on the ground, you can see where monsters might spawn without installing a mod.
Set visualize_block_light_levels to “Always” in Debug Options, and the nearby blocks show their block light value. Blocks with block light 0 show no number. The next screenshot shows a stone corridor with torches. The numbers on the floor get smaller the farther they are from a torch, and monsters have already spawned in the deep part of the corridor where the numbers disappear:
Block light is 0 wherever the floor has no number. Place torches there until every part of the floor shows a number, and monsters stop spawning in the corridor.
Slime chunks
Outside swamps, slimes spawn only inside slime chunks at Y 40 or below. F3 does not mark which chunk is a slime chunk. If you see slimes at Y 40 or below, press F3 + G to show chunk borders. Then you can see which chunk they gather in:
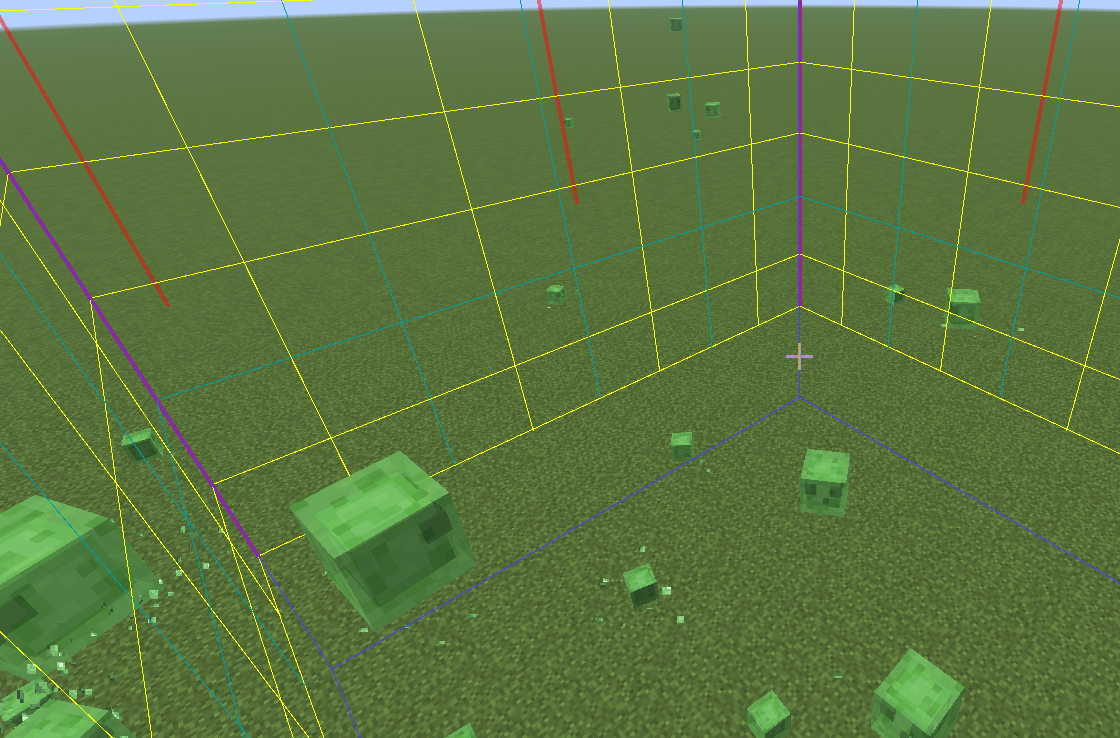
A few slimes also appear in the neighboring chunks, but the chunk with the most slimes is the slime chunk.
Your death location
The death screen in Java Edition shows only the cause of death, but you can open F3 on it. After you die, don’t click “Respawn” yet. Press F3 on the “You Died!” screen to see the coordinates where you died, then press F3 + C to copy them. The next screenshot shows the Traditional Chinese death screen, where “你死了!” is “You Died!”:

If you have already clicked “Respawn”, there are two other ways to find where you died:
| Method | Requirement | Result |
|---|---|---|
Enter /data get entity @s LastDeathLocation |
The world must allow commands | Chat shows the block coordinates of your death, for example pos: [I; 11, -60, 0] |
| Hold a Recovery Compass | Craft it from 8 Echo Shards and 1 Compass. It does not need commands | The compass points to your last death location |
In my test, the coordinates from LastDeathLocation were about 2 blocks off from the ones on the death screen, and the dropped items landed next to the death screen coordinates.
Shortcut reference
Hold F3 first, then press the other key. These are the results in 26.3:
| Shortcut | Result | Use |
|---|---|---|
| F3 + F6 | Opens “Debug Options” | Show entries that are hidden by default, such as light and biome |
| F3 + G | Chat shows “Chunk borders: shown” and the borders of your chunk are drawn | Find the chunk where slimes gather, or align a build to chunks |
| F3 + B | Chat shows “Hitboxes: shown” and white boxes appear around mobs | See how much space a mob takes up |
| F3 + C | Chat shows “Copied location to clipboard” and a /execute ... tp command is copied |
Save your current coordinates and facing |
| Hold F3 + C | Shows “F3 + C is held down. This will crash the game unless released.” and starts a countdown | Holding the keys crashes the game, so release them before the countdown ends |
| F3 + H | Chat shows “Advanced tooltips: shown” and item tooltips add durability and the item ID | See how much durability your tools and gear have left |
| F3 + P | Chat shows “Pause on lost focus: disabled” or “enabled” | Once disabled, the game does not pause when you switch windows while idling |
| F3 + N | Switches between Spectator Mode and your previous game mode | Look around temporarily in Spectator Mode |
| F3 + F4 | Opens the game mode switcher, and releasing F3 switches to the selected mode | Change game mode without typing a command |
| F3 + I | Chat shows “Copied server-side block data to clipboard” and a /setblock command is copied |
Get the name and state of a block |
| F3 + A | Chat shows “Reloading all chunks” | Reload chunks when blocks render incorrectly |
| F3 + T | Chat shows “Reloaded resource packs” | Reload a resource pack after editing it, without restarting the game |
| F3 + D | Clears the messages in chat | Clear the chat before taking a screenshot |
| F3 + L | Starts profiling for 10 seconds, then saves a compressed file in debug\profiling |
Record performance data when the game stutters |
| F3 + 1 to 4 | Cycles through the profiling chart, the FPS and TPS charts, the network charts and the lightmap texture | Watch how FPS, TPS and network latency change |
| F3 + V | Chat lists the version info, including the resource pack and data pack format versions | Check the pack format versions when making a data pack |
| F3 + X | Chat shows “Improved transparency: enabled” or “disabled” | Toggle “Improved Transparency” without opening the options |
| F3 + S | Chat shows “Saved dynamic textures to screenshots\debug” | Inspect the textures in the game when making a resource pack |
| F3 + Esc | Shows “Game Paused” at the top of the screen without opening the game menu, and pressing Esc again resumes | Pause the game for a screenshot |
F3 + Q and F3 + F were removed in newer versions. Pressing them now only drops the item in your hand or swaps it to the off hand, which is what Q and F do on their own.
F3 + N, F3 + F4 and F3 + I work only in a world that allows commands. When “Allow Commands” is off, F3 + N shows “Unable to switch game mode; no permission”, F3 + F4 shows “Unable to open game mode switcher; no permission”, and F3 + I does nothing. You can also turn on “Allow Commands” for an existing world from “World Options”, as described in the permissions section of Find strongholds, ancient cities and biomes with commands.
In a world with the reduced_debug_info game rule turned on, the debug screen does not show the coordinates, chunk or facing, and F3 + G, F3 + B, F3 + C and F3 + I do nothing. If you press F3 on a server and see no coordinates, the server may have turned this rule on. The rule has a different name in older versions, which you can look up in Minecraft gamerule old and new names.
Test notes
For the light test, I sealed a stone corridor and split it into two rooms with a wall. The room with torches had a torch every 8 blocks, and the other room had no light source. After /tick sprint 2400 advanced the game by 2,400 ticks, the room with torches had no monsters and the room without light had spawned 31. The seed of the slime test world was 20261112. I found a slime chunk with the algorithm recorded on the Minecraft Wiki. After two sprints totaling 7,200 ticks, that chunk had 11 slimes, and each of the four neighboring chunks had 0 to 2. For the death test, I was killed by a slime in Survival Mode. I got a Recovery Compass with /give and checked its direction about 20 blocks north of the death location.
Summary
Turn on the light level in Debug Options and check chunk borders with F3 + G, and you can see where monsters might spawn and which chunk the slimes gather in. In my test, the corridor without torches spawned 31 monsters and the corridor with torches spawned none.
Further reading