Word automatic numbering: multilevel lists for chapter headings, figure captions, and cross-references

Translated from the original Traditional Chinese version.

Summary

Word can handle chapter and figure numbers for you: apply Heading 1 to 3 styles, link each level of a multilevel list to a heading style, and create figure numbers with Insert Caption and Cross-reference. After you add or remove a chapter or figure, press Ctrl + A and then F9, and the numbers renumber themselves. A thesis is the example here.

Table of contents

Don’t type chapter and figure numbers by hand in a Word thesis. When you add or remove one chapter or figure, you have to fix every number after it. Set up three things in order instead: apply the Heading 1 to 3 styles to your chapter headings, use a multilevel list so the numbers follow those styles, then create figure captions with Insert Caption and refer to them in your text with Cross-reference.

The order matters. A multilevel list links to heading styles, and a figure number that includes the chapter needs chapter numbers first. I used Word in Microsoft 365 with a sample thesis that has three heading levels.

My sample comes from a Chinese thesis format, and my Word runs in Traditional Chinese. Every screenshot shows Chinese labels and text, so the steps give the English name of each command and field, and the alt text says what each screenshot shows. Two details in the sample come from that format, and I call them out where they appear: Heading 1 uses Chinese numerals, and the figure label is the Chinese word for figure. I ran the steps with those values, not with an English sample.

Set up heading and body styles

The sample format is Heading 1 at 14 pt, bold, and centered, Heading 2 at 12 pt, bold, and centered, and Heading 3 at 12 pt, bold, and left aligned. Use whatever your school requires.

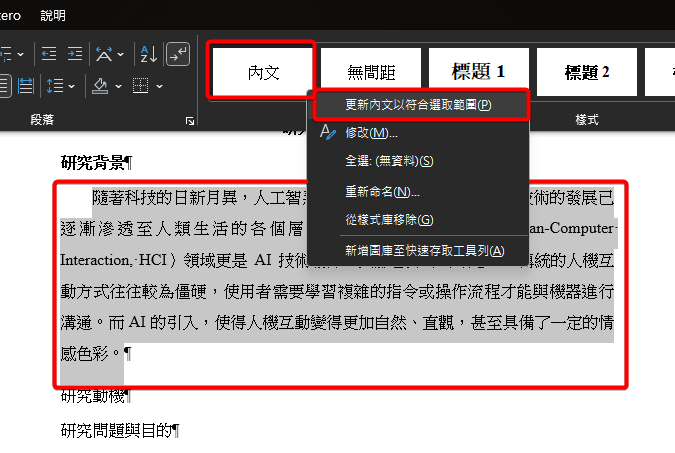
First, format the Introduction heading as you want Heading 1 to look, and select it. On Home > Styles, right-click Heading 1 and choose Update Heading 1 to Match Selection. The heading’s formatting is now stored in the Heading 1 style.
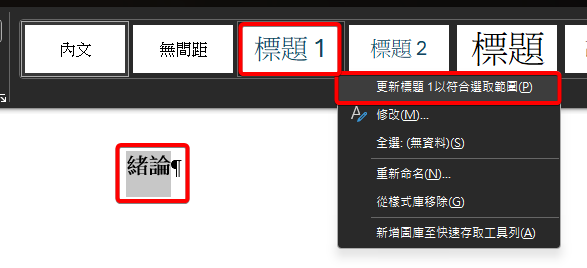
The Introduction heading is selected. In the Styles gallery, the right-click menu on Heading 1 has Update Heading 1 to Match Selection marked
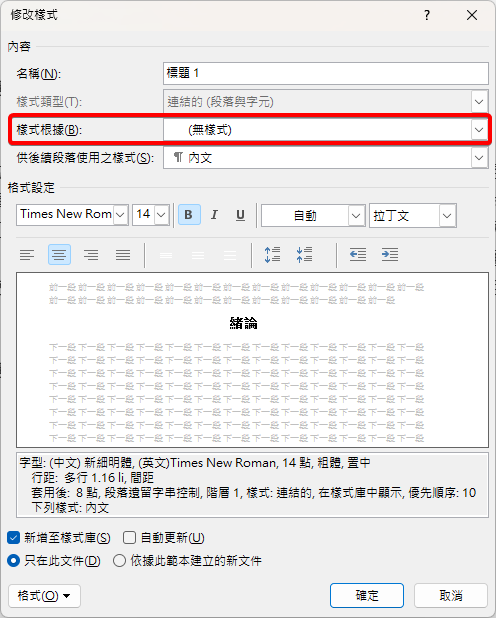
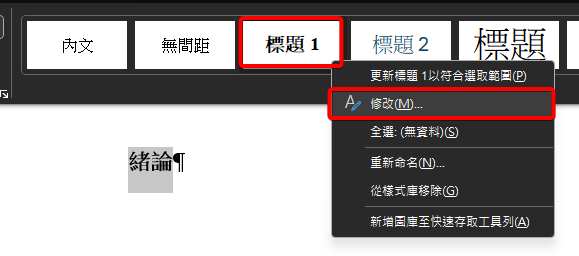
Next, right-click Heading 1 and choose Modify. Change Style based on to (no style) and click OK. By default a heading style is based on another style. With (no style), later changes to the body text style won’t affect your headings.

The right-click menu on Heading 1 in the Styles gallery, with Modify marked
The Modify Style dialog with the name Heading 1 and Style based on changed to (no style)
Do the same for the other levels. In my sample, Research Motivation becomes Heading 2 and Virtual Reality becomes Heading 3, and both styles also get Style based on set to (no style).

For body text, select a paragraph, right-click it, and choose Paragraph. The sample uses Justified alignment, Special set to First line with a value of 2 characters, and Line spacing set to 1.5 lines. The 2-character indent is part of my sample’s Chinese format, so enter your own value. Click OK, then right-click Normal in the Styles gallery and choose Update Normal to Match Selection.
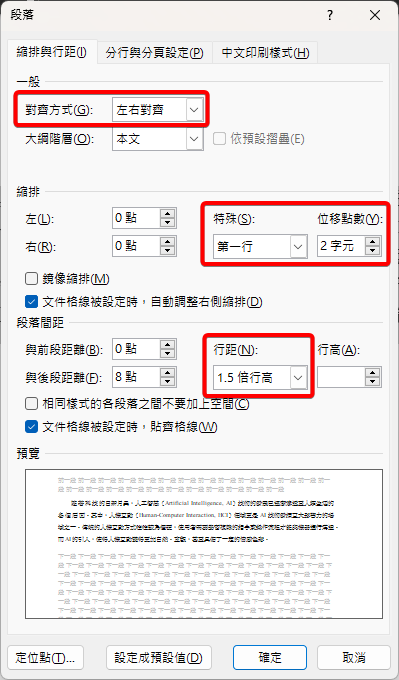
The Paragraph dialog with Alignment set to Justified, Special set to First line at 2 characters, and Line spacing set to 1.5 lines
A body paragraph is selected. In the Styles gallery, the right-click menu on Normal has Update Normal to Match Selection marked
Finally, select each remaining chapter heading and click Heading 1, Heading 2, or Heading 3 in the Styles gallery according to its level. Hold Ctrl to select several headings at once.
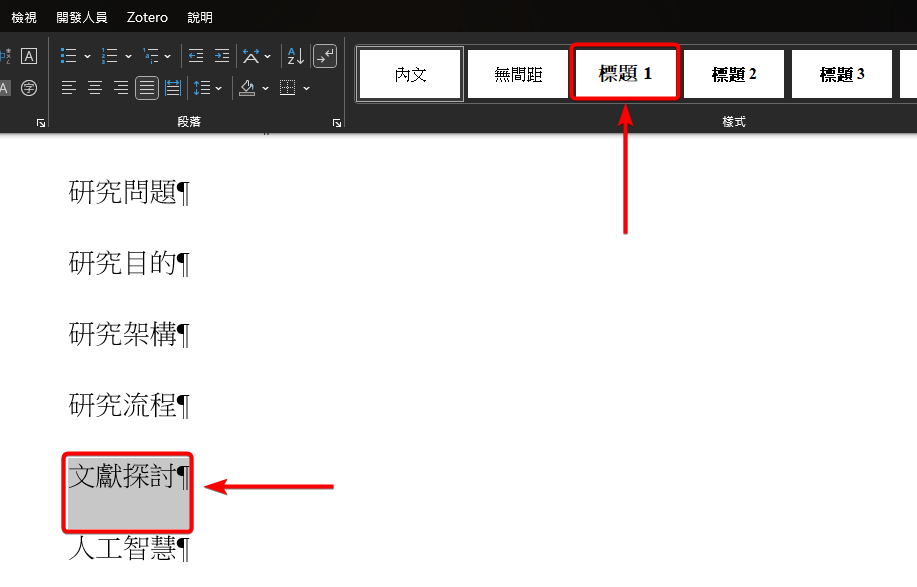
The Literature Review heading is selected, and Heading 1 is marked in the Styles gallery

Number headings with a multilevel list

The numbering scheme in my sample is 壹、 for Heading 1 (a Chinese numeral followed by Chinese punctuation), 1.1 for Heading 2, and 1.1.1 for Heading 3.

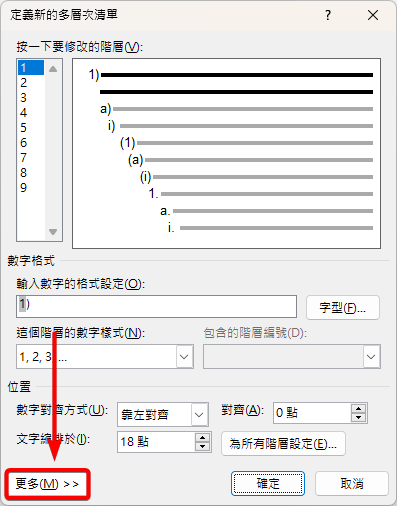
Put the cursor in any Heading 1 paragraph and go to Home > Multilevel List > Define New Multilevel List. Then click More at the lower left to show all the settings.
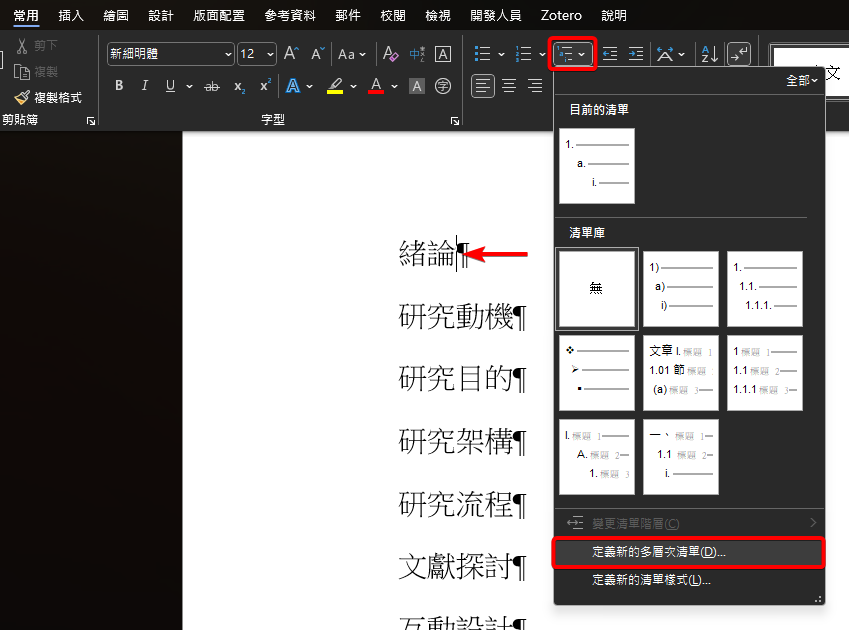
The Multilevel List menu on the Home tab, with Define New Multilevel List marked
The Define new Multilevel list dialog with the More button marked at the lower left. Number style for this level shows 1, 2, 3 and the number format shows 1)

Level 1: Heading 1

Select level 1 under Click level to modify, then set these in order:

  1. Set Link level to style to Heading 1.
  2. Set Number style for this level to 壹, 貳, 參 …, the Chinese numerals my format requires. The dialog opens on 1, 2, 3, as the previous screenshot shows, so keep that if your thesis numbers chapters 1, 2, 3. I did not run the steps with 1, 2, 3 on this level.
  3. In Enter formatting for number, delete the default ) and type any punctuation your format needs after the highlighted number. I typed 、 after 壹. The highlighted part is the automatic number, so don’t delete or change it.
  4. Set Follow number with to Space, and set Text indent at to 0 pt.
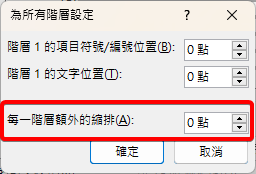
  5. Click Set for All Levels and set Additional indent for each level and the other fields to 0 pt.
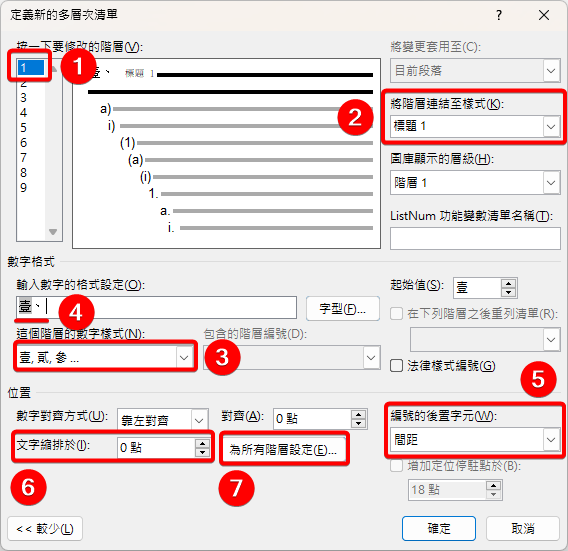
The settings for level 1, with callouts in order on level 1, Link level to style set to Heading 1, the Chinese numeral number style, the number format, Follow number with set to Space, Text indent at set to 0 pt, and Set for All Levels
The Set for All Levels dialog with the number position, text position, and Additional indent for each level all at 0 pt

Level 2: Heading 2

Select level 2 and set Link level to style to Heading 2. Move the cursor to the very start of Enter formatting for number, choose Level 1 under Include level number from, and tidy the format so that it reads 壹.a, with the number from level 1, a period, and this level’s letter. Set Follow number with to Space, and leave Restart list after checked as it is by default.
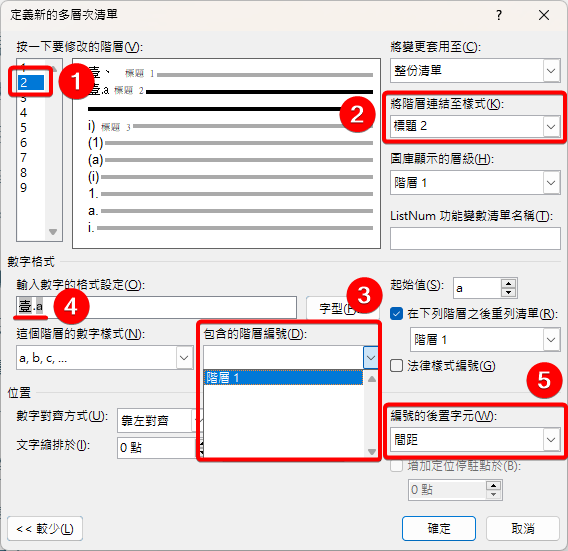
The settings for level 2, linked to Heading 2. Include level number from is set to Level 1, the format reads the Chinese numeral, a period, and a, and Follow number with is Space
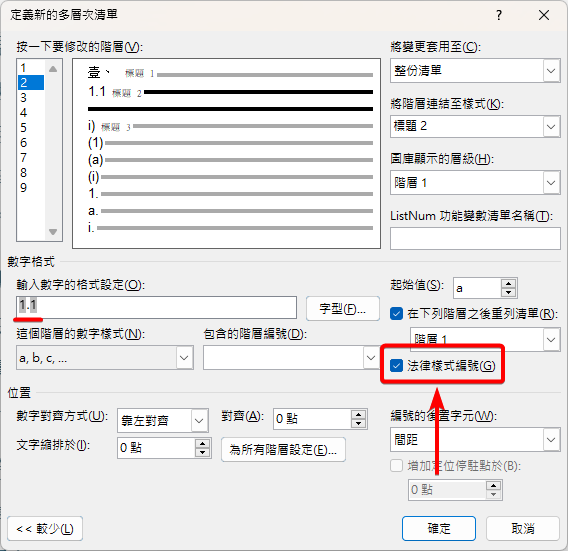
At this point the number still reads 壹.a. Check Legal style numbering and it changes to 1.1, in Arabic numerals.

With Legal style numbering checked, the format for level 2 changes to 1.1

Level 3: Heading 3

Link level 3 to Heading 3. Under Include level number from, add Level 1 and then Level 2, and tidy the format so that it reads 壹.a.i. Set Follow number with to Space, check Legal style numbering so that it becomes 1.1.1, and click OK.
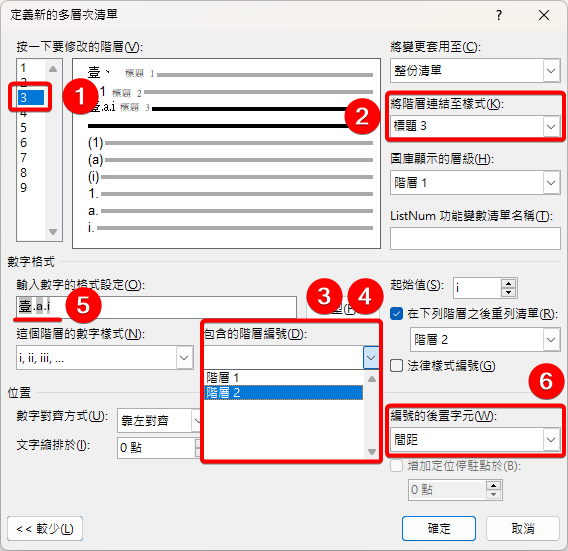
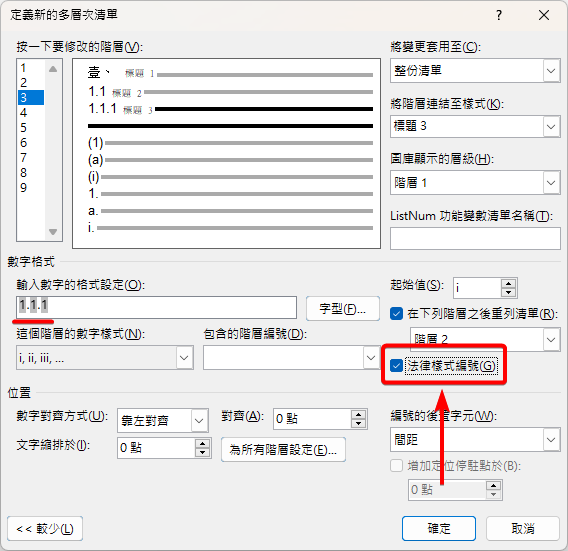
The settings for level 3, linked to Heading 3. It includes Level 1 and Level 2, the format reads the Chinese numeral, a, and i separated by periods, and Follow number with is Space
With Legal style numbering checked, the format for level 3 changes to 1.1.1
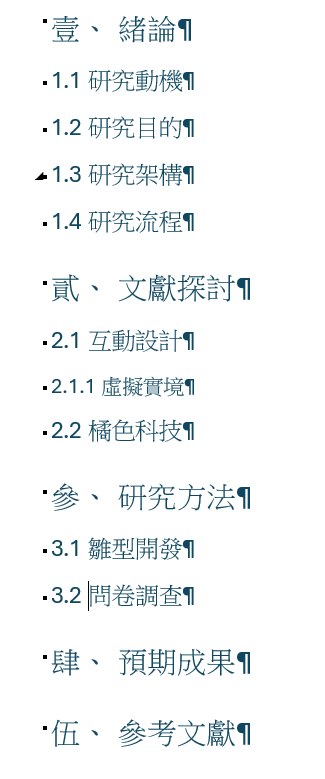
After you click OK, every paragraph with a heading style gets its number automatically.

Headings after automatic numbering. Under the first chapter, Introduction, is 1.1 Research Motivation. The second chapter, Literature Review, has 2.1 and 2.1.1. The last is the fifth chapter, References
For a heading that shouldn’t have a number, such as References, select it and go to Home > Numbering to remove the number. It keeps the Heading 1 style.
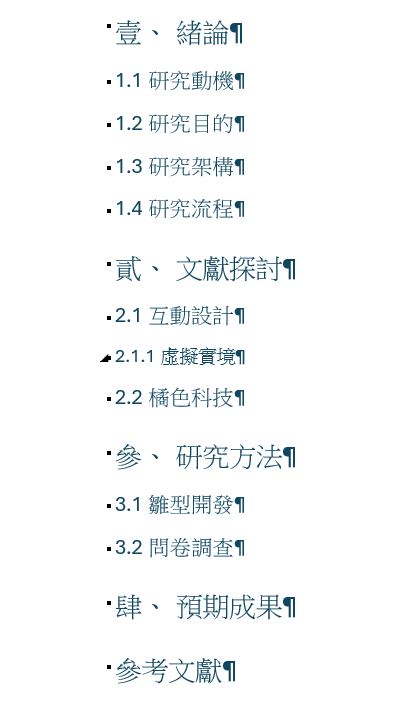
With its number removed, the References heading no longer shows the fifth chapter number, and the other heading numbers are unchanged

Insert figure and table captions

Select the picture you want to caption and go to References > Insert Caption.
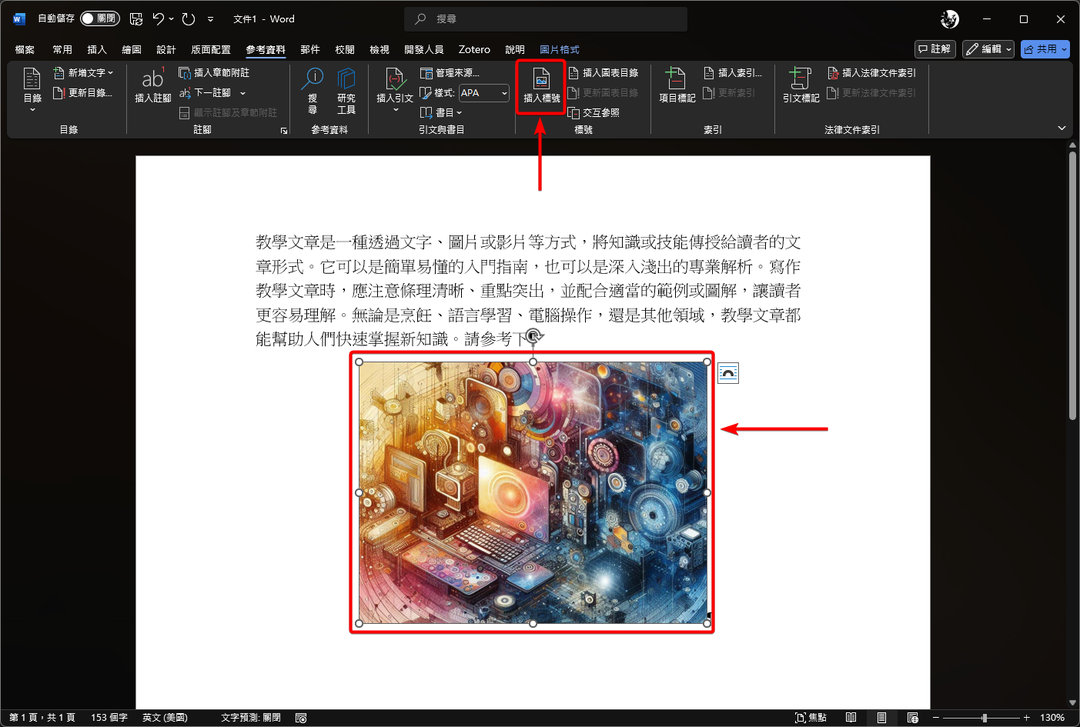
A picture is selected, and Insert Caption is marked on the References tab
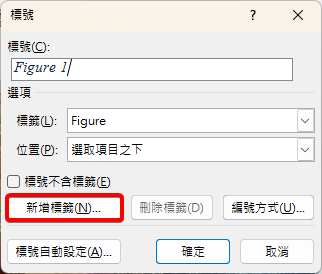
Label defaults to Figure. Keep it for figures and choose Table for tables. Click New Label only when you need a label Word doesn’t provide. My format needs the Chinese word 圖 (figure), so I created that label. That is why the next screenshots read 圖 1 where yours would read Figure 1.

The Caption dialog with Label set to Figure and the New Label button marked
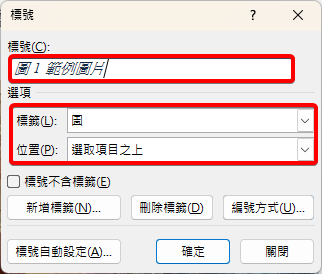
Back in the Caption dialog, select your label. In the Caption box, type your description after the label and number, choose in Position whether the caption goes above or below the picture, and click OK. My sample caption means “Figure 1 Sample picture”, and it sits above the picture.

The Caption dialog with the caption reading Figure 1 Sample picture in Chinese, the Chinese figure label selected, and Position set to Above selected item
The caption Figure 1 Sample picture, in Chinese, appears above the picture

Add chapter numbers to figure numbers

If your figure numbers need to include the chapter, click Numbering in the Caption dialog, check Include chapter number, set Chapter starts with style to Heading 1, and set Use separator to a hyphen. The chapter number comes from your Heading 1 numbering. According to Microsoft’s instructions, when Heading 1 is numbered 1, 2, 3, the first figure in chapter 2 is Figure 2-1.

Reference figure numbers with cross-references

When your text says “as shown in Figure 1”, don’t type that number either. Put the cursor where the reference goes and go to References > Cross-reference. Set Reference type to your label, Figure in most cases, set Insert reference to to Only label and number, select the figure in the For which caption list, and click Insert.
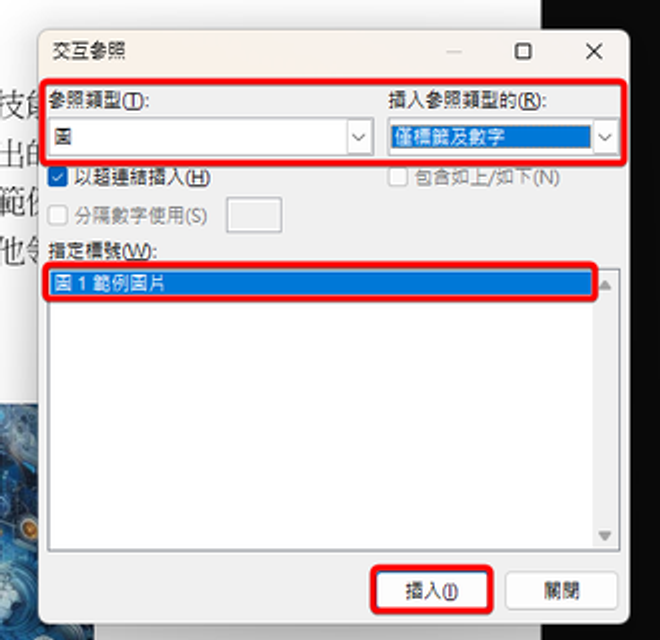
The Cross-reference dialog with Reference type set to the Chinese figure label, Insert reference to set to Only label and number, and Figure 1 Sample picture selected in the list of captions
The inserted reference is a field, so it follows changes to the caption number.

Update numbers after adding or removing figures

Add a picture with a caption in front of the original Figure 1. The new picture becomes Figure 1, but the cross-reference in your text doesn’t change right away.
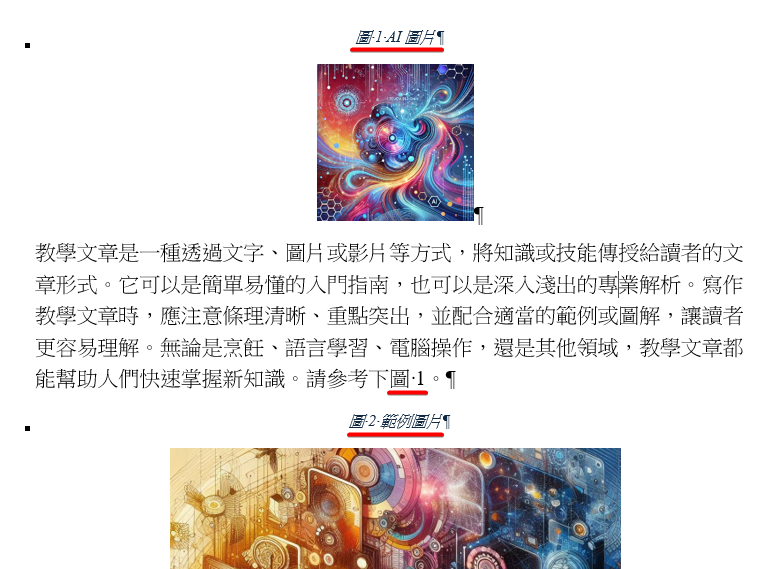
The new AI picture is labeled Figure 1, the original sample picture has become Figure 2, and the reference in the text still says Figure 1
Press Ctrl + A to select the whole document and then press F9, or right-click the selection and choose Update Field.
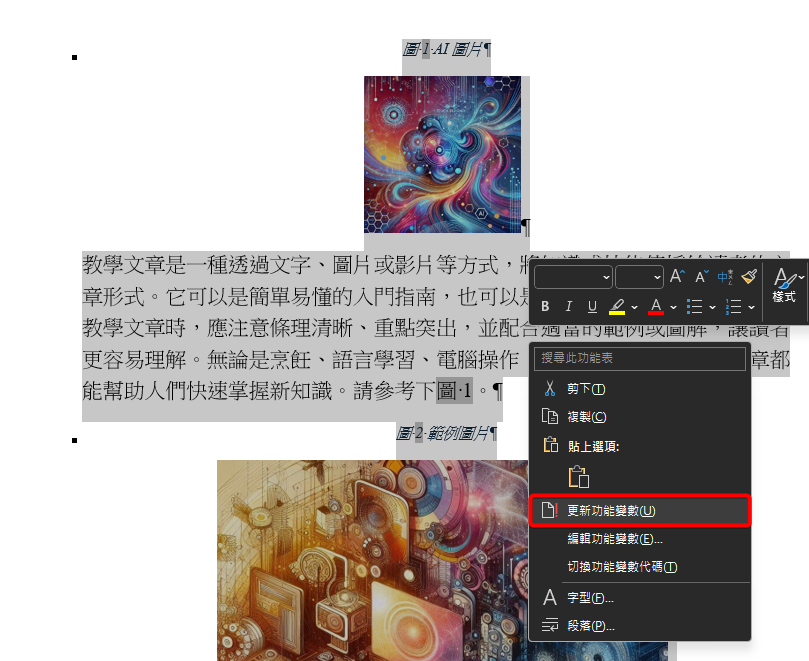

The whole document is selected, and the right-click menu has Update Field marked
After the update, the reference in the text changes to the correct Figure 2.

After Update Field, the reference in the text has changed to Figure 2, matching the caption below it

Summary

Once this is set up, adding or removing a chapter or figure only takes Ctrl + A followed by F9, and the numbers across the whole document renumber themselves.

Where to go next

PreviousUse an iPad as a second monitor for Windows with GlideX (Wi-Fi or USB)WorkflowNextMinecraft OneBlock map install: one-block skyblock survival for Java 1.15 to 26.1Games
Ted Liou

Ted Liou

Software engineer writing about Unity and AI development. Available for consulting.