Table of contents
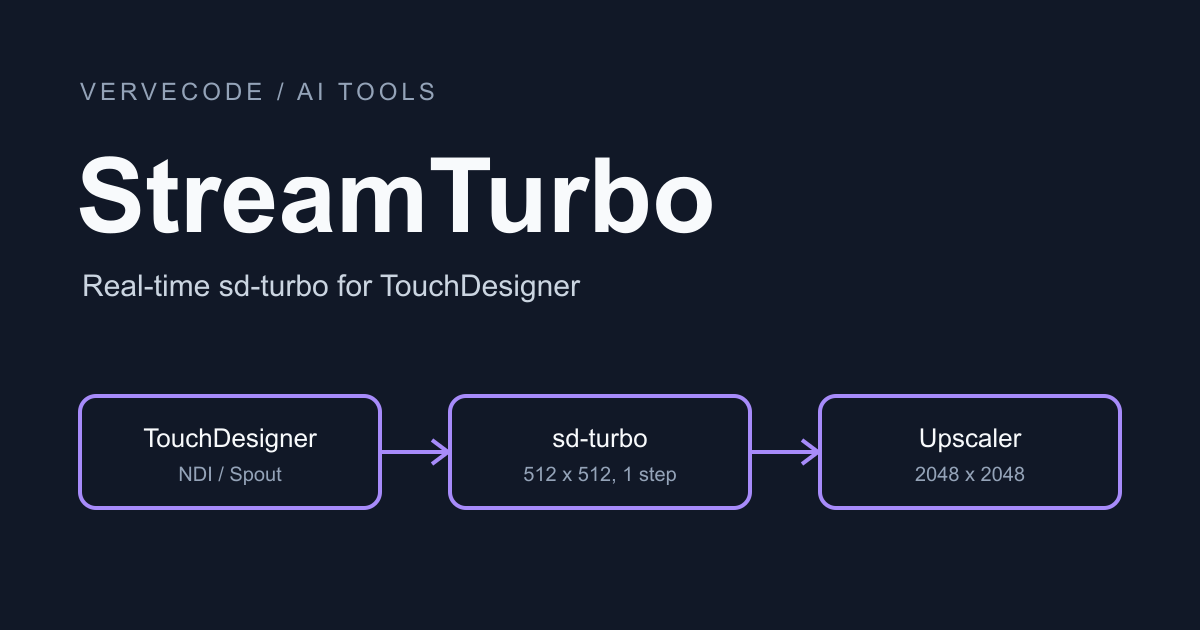
StreamTurbo is a real-time AI image tool I built for TouchDesigner (TD below). TD sends a frame, StreamTurbo repaints every frame with sd-turbo, the single-step generation model from Stability AI, and sends the result back to TD. To install it, download the project and double-click start.cmd. Python, the CUDA packages, the models, and TensorRT acceleration are all prepared automatically, so you do not have to match versions yourself. The generated 512×512 frames can go through the built-in upscaling model, the Upscaler, to reach 2048×2048, which runs at about 21 frames per second (fps) on an RTX 3070. A laptop GPU with 4 GB of VRAM can run it too, with no change to the settings or the output resolution.
StreamTurbo was rewritten as a standalone project from StreamDiffusion. Following the StreamDiffusion install guide often ends in version conflicts between Python, CUDA, or huggingface_hub, such as ImportError: cannot import name 'cached_download' from 'huggingface_hub', which happens because diffusers is not compatible with newer versions of huggingface_hub. StreamTurbo pins every package version with a lockfile (a file that records the exact version of each package), which avoids this kind of problem. This article is based on version 1.0.0.
How it differs from StreamDiffusion
StreamDiffusion is designed for multi-step generation, where one image is computed several times, and its speedups such as Stream Batch and Residual CFG all assume multiple steps. sd-turbo needs only one step to produce an image, so StreamTurbo drops those features and uses a pipeline built only for single-step generation. It is no longer compatible with the original project.
| Item | StreamTurbo 1.0 | StreamDiffusion |
|---|---|---|
| Installation | start.cmd installs pinned package versions automatically |
Install Python, CUDA, and PyTorch by hand |
| Model | sd-turbo only, one step per frame | Several models, multi-step generation |
| Upscaling | Built-in Upscaler, 2× or 4× | Not included |
| Connection to TD | NDI or Spout, with a sample component | No TD component included |
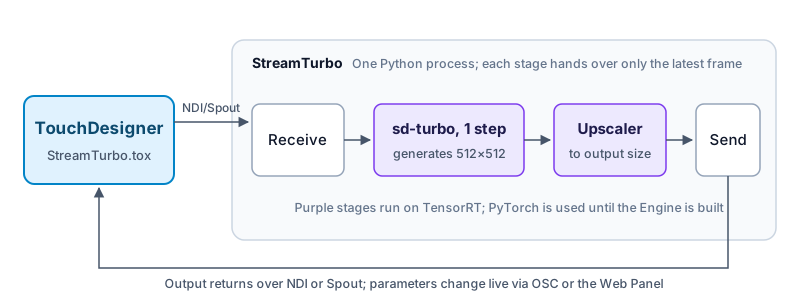
It also handles frames differently. StreamTurbo splits receiving, generating, and sending into three jobs that run at the same time and hand over only the latest frame. When generation cannot keep up, it drops old frames, so latency does not keep growing.
Requirements and installation
| Item | Requirement |
|---|---|
| Operating system | Windows 10 or 11, x64 |
| GPU | NVIDIA RTX 20 series or newer, 4 GB of VRAM or more, 8 GB recommended |
| Driver | 580 or newer |
| Other | git |
Mac, AMD GPUs, Linux, and WSL are not supported. You do not need to install Python, the CUDA Toolkit, Visual Studio, or NDI Tools separately. Open a command prompt, download version 1.0.0 with git, and run start.cmd. Afterwards you can also double-click start.cmd in File Explorer:
1git clone --branch v1.0.0 https://github.com/tedliou/StreamTurbo.git
2cd StreamTurbo
3start.cmd
start.cmd first checks the driver version, then installs a pinned version of uv (a Python package manager) into cache\bin in the project, and syncs Python 3.12 and all packages from the lockfile. The first run downloads several GB of packages, and after startup it downloads about 2.3 GB of model weights. All downloads stay inside the project folder, so you can remove everything by deleting the folder.
Then start.cmd runs streamturbo doctor to check the environment, starts generating once it passes, and opens the Web Panel (http://127.0.0.1:8765/) in the browser. Below is the doctor output of this RTX 3070 after the Engines were built, and its last line is OK. On the first run the Engines are not built yet, so the Engines line does not read all 4 built, and that is normal:
1GPU
2  [0] NVIDIA GeForce RTX 3070
3      VRAM          8.0 GB
4      power limit   162 W enforced of 270 W default (60%)
5Libraries
6  torch             2.14.1+cu130
7  TensorRT          10.16.1.11
8  Engines           all 4 built in E:\StreamTurbo\engines
9Transports
10  NDI               available
11  Spout             available: SpoutGL 0.1.1
12
13OK
TensorRT is NVIDIA’s inference acceleration tool. It compiles each model separately for each GPU, and the compiled result is called an Engine. An Engine works only on the GPU it was compiled for, so a different GPU needs a recompile. StreamTurbo does not ship Engines with the project. It builds them in the background on your GPU at the first start, which takes about 4 minutes on an RTX 3070. Until they are built, output uses PyTorch without acceleration, at about half the speed. The Backend field at the top of the Web Panel shows the build progress, and when it changes to tensorrt, acceleration is active. To build the Engines before you use it, run .venv\Scripts\streamturbo build-engines.
To update to a newer version, run git fetch --tags and git checkout v1.x.x (replace it with the tag of the new version) in the project folder, then run start.cmd again. Your own Presets (a saved set of look settings), the last settings in last-settings.toml, the models, and the Engines are not in git, so an update keeps them.
Connect to TouchDesigner
StreamTurbo and TD exchange frames over NDI or Spout. Both are protocols for passing live video between programs. Spout works only inside one computer and does not compress the frames. NDI goes over the network, so it can cross computers. On the first run, StreamTurbo uses NDI to receive and send frames by default.
The simplest way is to use the sample component that ships with the project. Drag touchdesigner/StreamTurbo.tox into your TD project, connect the frames you want to convert to the input of the component, and the output of the component is what StreamTurbo sends back. With no input connected, the component sends a moving test pattern, which you can use to check the connection first. When the source status on the Status page of the component, or on the Web Panel, changes from waiting to live and the frames per second show a number, it is connected.
Select the sample component, and the StreamTurbo page of the parameter panel lets you adjust the common settings directly. Changes are sent over OSC (a protocol for sending control messages between programs) to StreamTurbo on the same computer:
| Parameter | What it does |
|---|---|
| Transport | Switches between NDI and Spout, and changes the TD send and receive and the StreamTurbo source and output together |
| Prompt | The text prompt that describes the image |
| Strength | The closer to 0, the more of the input frame is kept. The closer to 1, the more it is repainted from the prompt. The default is 0.68 |
| Seed | A number that decides the random pattern. A different number gives a different drawing |
| Temporal Coherence | Lets each frame refer to the features of the previous frame, so details jump around less |
| Preset | Applies or saves a set of look settings, including the prompt and Strength |
The Status page shows the source status, frames per second, and generation time. Measure Latency makes the component switch between a black frame and a white frame, times how long it takes for the brightness of the returned frame to follow, and gives you the round-trip latency from send to receive under the current settings.
If you are familiar with OSC, settings the sample component does not cover can also be sent from the OSC Out of TD straight to port 7000 of StreamTurbo, with the address set to the path of the setting, for example /streamturbo/strength or /streamturbo/prompt_transition. When you send Strength from a signal that changes continuously, such as an LFO, the image follows smoothly over the number of seconds in strength_glide instead of jumping frame by frame. To have AI help wire things up inside TD, see Let AI operate your TouchDesigner project with td-cli.
Adjust the prompt and resolution in the Web Panel
The Web Panel is the control page that StreamTurbo opens automatically in the browser at startup, at http://127.0.0.1:8765/. The sample component only exposes a few common parameters, and all the settings are here. The screenshot below shows the Web Panel while the sample component sends the test pattern and StreamTurbo is generating:
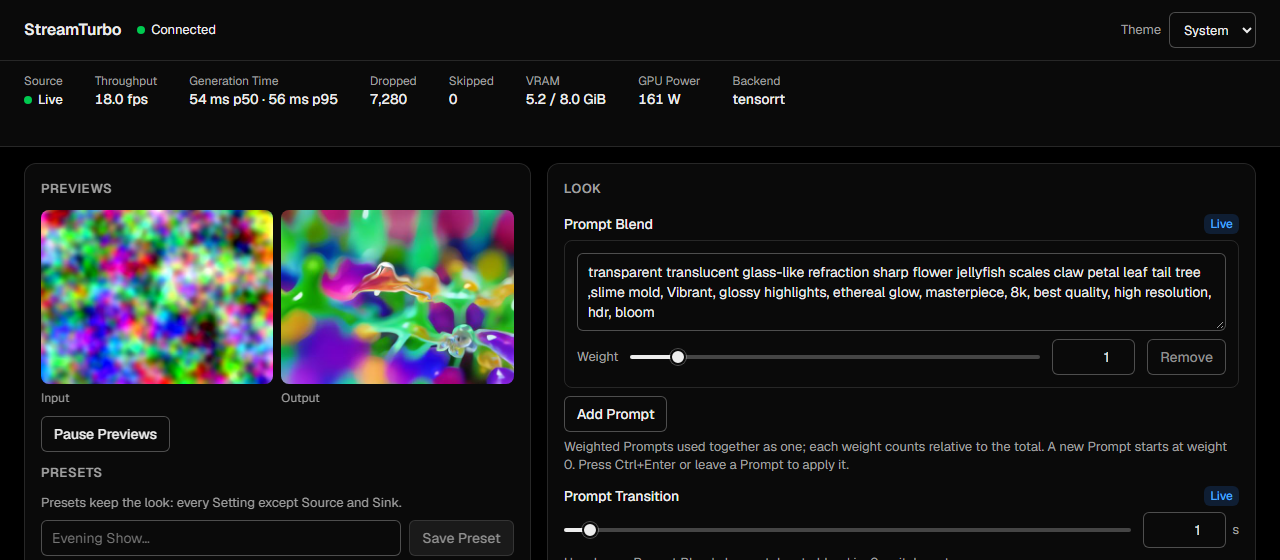
The prompt is in Prompt Blend on the right. After you edit it, press Ctrl+Enter or click outside the field to apply it, and the image changes gradually over the number of seconds in Prompt Transition. Add Prompt adds another prompt, and each one gets its own Weight. The tag at the top right of each setting tells you how it is applied. Live takes effect on the next frame without interrupting the output. Reset reallocates the buffers, so the output pauses for a moment.
Scroll down for two groups of settings, the generation resolution and the output resolution:
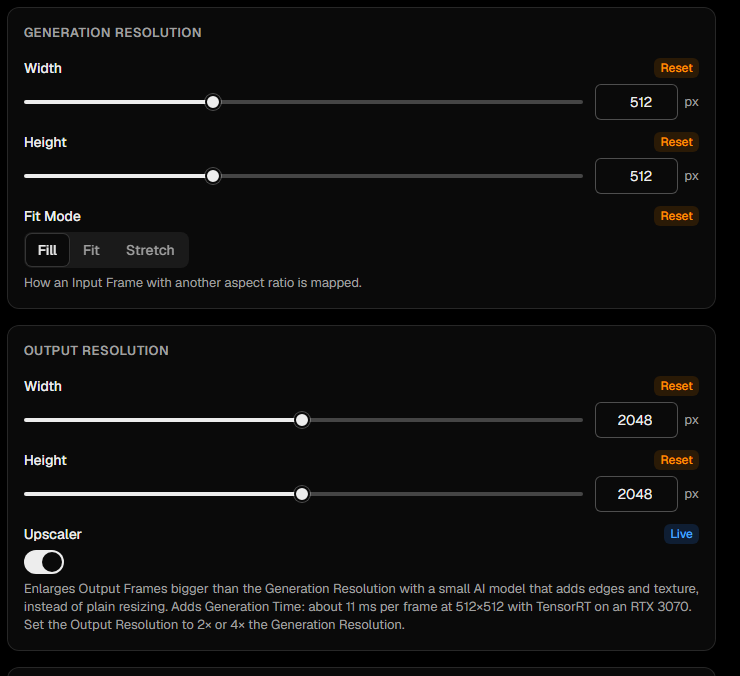
- Generation Resolution is the size at which sd-turbo actually draws, and it decides the processing time per frame and the VRAM use. The frame from TD is first scaled to this size, and when the aspect ratios differ, Fit Mode decides what happens: Fill crops to fill, Fit adds black bars, and Stretch stretches the image.
- Output Resolution is the size of the frame sent back to TD. It does not change how sd-turbo draws, and only decides how large the result is enlarged to. When the output is larger than the generation size, the Upscaler enlarges it with an AI model and adds detail if it is turned on, and with it off the frame is just scaled normally. The hint in the interface suggests setting it to 2× or 4× the generation resolution.
For example, if TD sends a 1920×1080 frame, with generation at 512×512, output at 2048×2048, and Fit Mode set to Fill, StreamTurbo first crops the frame to a square and scales it to 512×512 for generation, then enlarges it to 2048×2048 with the Upscaler and sends it back to TD. For a larger output, raise the output resolution and keep the generation resolution at 512×512. Both resolution groups are Reset settings, so the output pauses for a moment when you change them.
The Web Panel, the sample component, and OSC all change the same settings. When StreamTurbo exits, it saves them to last-settings.toml in the project folder and uses them again at the next start. You can also write the settings in a text file and start with start.cmd --settings filename.toml. The default generation resolution is 1024×768. The settings file below changes it to the 512×512 generation and 2048×2048 output used in this article, and any setting not written stays at its default:
1temporal_coherence = true
2upscaler = true
3
4[generation]
5width = 512
6height = 512
7
8[output]
9width = 2048
10height = 2048
[generation] is the generation resolution, and [output] is the resolution sent back to TD. Single-line settings such as upscaler and temporal_coherence must be written before sections such as [generation], or they are treated as settings inside the section. See the settings file example in the README for all fields.
Get a stable image
With real-time generation, the image tends to flicker. sd-turbo generates each frame independently, so when the input changes slightly, the whole pattern grows again from scratch. StreamTurbo has two independent settings to deal with this:
- Temporal Coherence lets the model refer to the internal features of the previous frame while generating, so details that were already there tend to stay in place. It is on by default.
- Temporal Smoothing blends the previous frame into this one. The higher the value, the steadier the image, but fast motion leaves trails. The default is 0.2.
If the image still flickers, first check that Temporal Coherence is on, then raise Temporal Smoothing from 0.2, or lower Strength. You can use Prompt Blend to hold several prompts with weights at once, and when you change prompts, the image fades over the number of seconds in prompt_transition. For scenes where the image is still, you can turn on Similar Frame Skip, which resends the previous frame without generating again when the input has barely changed.
Upscale the 512×512 output with the Upscaler
sd-turbo is a model trained at 512×512. If you generate a larger image directly, the composition tends to repeat or fall apart, so the steadier way is to generate at 512×512 and enlarge. The problem is that a screen or projector often needs 1920 or more, and ordinary scaling only stretches the pixels, so the edges turn soft after enlarging.
The StreamTurbo Upscaler is a small super-resolution model. Its architecture comes from the SRVGGNetCompact of Real-ESRGAN, reimplemented in the project, and it has its own TensorRT Engine. It sits after generation and before sending, and it adds edges and texture as it enlarges. The model always enlarges by 4× and then scales to the output resolution you set, so there are two ways to use it:
| Mode | Settings | How it works |
|---|---|---|
| 4× | Generate 512×512, output 2048×2048 | Send the 4× frame from the model as is |
| 2× | Generate 512×512, output 1024×1024 | The model enlarges 4×, then the result is scaled down to half |
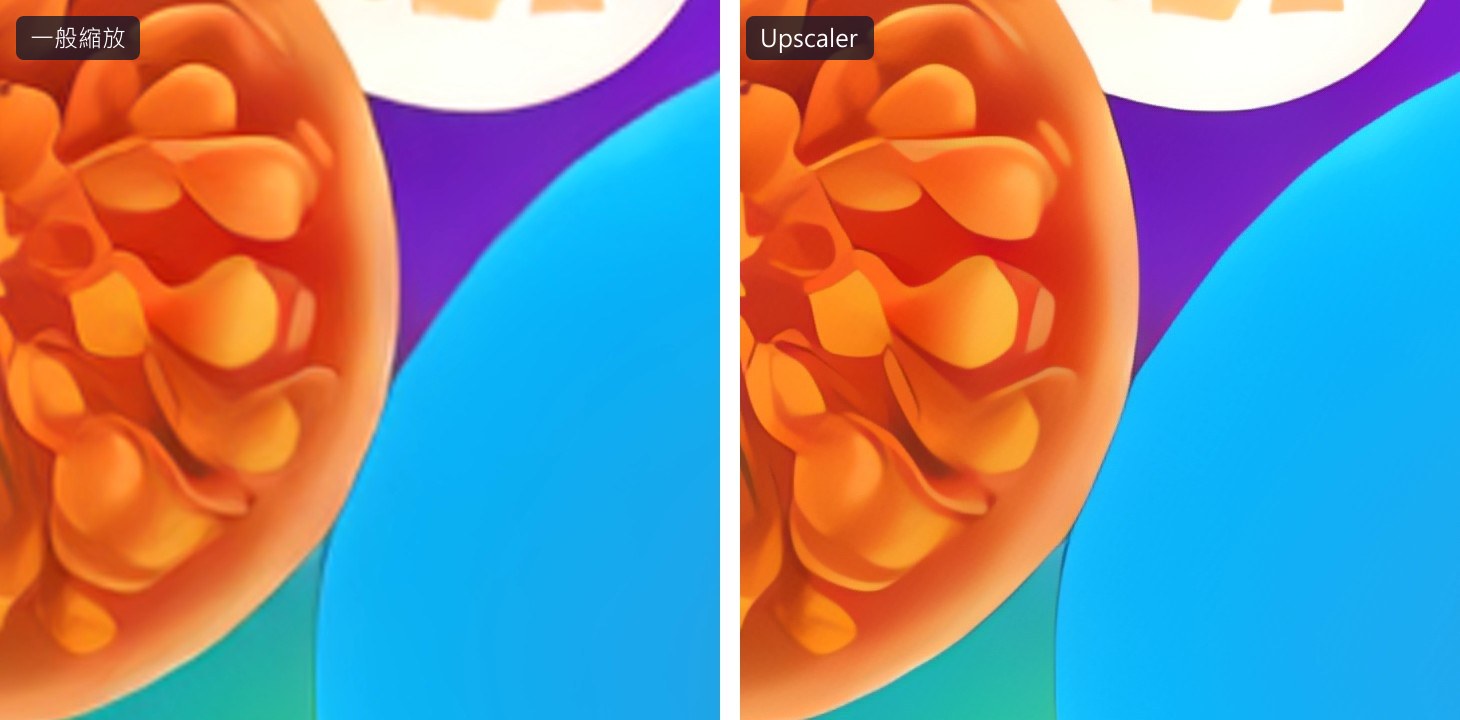
The Upscaler runs by default whenever the output resolution is larger than the generation resolution. Write upscaler = false in the settings file or turn it off in the Web Panel to go back to ordinary scaling. In the image below, both sides are 2048×2048 output, cropped to the same region for comparison:
| Item | Setting |
|---|---|
| GPU | RTX 3070 8 GB, driver 621.01 |
| Power limit | 162 W, which is 60% of the 270 W default of this card |
| Generation | 512×512 |
| Image settings | Default prompt, Strength 0.68, Temporal Coherence on |
I measured four outputs with streamturbo bench. bench runs 300 frames of a fixed reference image and measures the speed of StreamTurbo itself, without NDI or Spout, and I averaged two runs for each case. p50 is the median, so half of the frames are faster than this value:
| Output | Upscaling | Frames per second | Processing time per frame, p50 |
|---|---|---|---|
| 512×512 | None | 30.4 fps | 32.1 ms |
| 2048×2048 | Ordinary scaling | 26.2 fps | 37.3 ms |
| 1024×1024 | Upscaler 2× | 22.3 fps | 44.2 ms |
| 2048×2048 | Upscaler 4× | 21.3 fps | 46.0 ms |
For the same 2048×2048 output, the Upscaler costs about 9 ms more per frame, and the frame rate drops from 26.2 to 21.3. The difference between 2× and 4× is under 2 ms, because both run the same 4× model. If you do not need 2048, 2× is enough.
TensorRT acceleration and transport latency
Backend in the Web Panel tells you how StreamTurbo runs the models. For the same 512×512 generation with the Upscaler enlarging to 2048×2048, the difference between TensorRT and PyTorch is below. PyTorch is the speed at the first start while the Engines are still being built:
| Backend | Frames per second | Processing time per frame, p50 | VRAM used by the whole GPU |
|---|---|---|---|
| TensorRT | 21.3 fps | 46.0 ms | 5.8 GiB |
| PyTorch | 11.7 fps | 84.6 ms | 4.0 GiB |
The VRAM figure is for the whole GPU, including about 1.1 GiB that the desktop and other programs already use at idle. TensorRT is almost twice as fast as PyTorch, at the cost of about 1.8 GiB more VRAM for the Engines.
With TD actually connected, I measured the round-trip latency in my test TD project with Measure Latency of the sample component, twice for each transport, with 10 round trips each time. The frames per second and processing time per frame while running come from Status on the same page:
| Transport | Round-trip average | Min | Max | Frames per second while running | Processing time per frame, p50 |
|---|---|---|---|---|---|
| Spout | 153–162 ms | 133 ms | 183 ms | 14.4 fps | 67 ms |
| NDI | 428–430 ms | 400 ms | 467 ms | about 16 fps | 61–63 ms |
On the same computer, the latency of Spout is less than half that of NDI. However, the processing time per frame is longer than the 46 ms from bench in both cases, and the frame rate drops to between 14 and 16. A 2048×2048 RGBA frame is about 16 MB, and my guess is that the copies for receiving and sending these frames compete with generation for the GPU.
It also runs on a 4 GB GPU
A GPU with less than 6 GB of VRAM enters Low-VRAM Mode automatically. Low-VRAM Mode is a memory-saving mode for small GPUs. It pauses the output and takes over the GPU while the Engines are built, and it caps the generation resolution at 512 per side. If you set more than that, the frame is scaled down internally while keeping the aspect ratio, and the setting in the Web Panel and the output resolution sent back to TD do not change. The 512×512 generation used in this article is already within the cap, so it is not scaled down. Each time it loads the built Engines at startup, the output pauses for a few seconds.
I borrowed an RTX 3050 Laptop (4 GB of VRAM) and ran it for real, with TD open at the same time and sending frames into StreamTurbo over Spout. It entered Low-VRAM Mode automatically at startup, built all the Engines successfully, and switched to TensorRT. That run used the default resolution. The generation setting of 1024×768 is above the cap, so it generated internally at 512×384 and enlarged back to 1024×768 with the Upscaler for output, and the settings and output resolution in the Web Panel did not change. Below are the numbers from the Web Panel:
| Backend | Frames per second | Processing time per frame, p50 | p95 | VRAM used by the whole GPU | GPU power draw |
|---|---|---|---|---|---|
| TensorRT | 5.8 fps | 163 ms | 168 ms | 3.9 of 4.0 GiB | 40 W |
p95 means that 95% of the frames finish within this time. For the same 512×384 plus Upscaler, the p50 of the RTX 3070 with a 60% power limit is 26.6 ms (PR #30), so the laptop is about 6× slower. I did not measure the Engine build time on that laptop. The full record is in GitHub issue #28.
Troubleshooting
| Situation | What to do |
|---|---|
The Web Panel status stays at waiting |
Check the source name with .venv\Scripts\streamturbo run --list-sources, and for NDI also check that the firewall allows it |
| Spout Out says the Sender Name is already in use | Use a different name, or restart TD to release the leftover name |
| After restarting StreamTurbo, the frames TD receives are frozen | The Spout In of TD is still connected to the previous sender, so select Transport again on the sample component |
| The whole computer slows down and the frame rate drops to single digits | Check in the Web Panel whether VRAM is near the limit. If it is, close other programs that use VRAM, or change the output to Upscaler 2× |
| A change of prompt or Strength takes a while to show | This is the gradual change from prompt_transition and strength_glide. Set them to 0 for an immediate switch |
One problem remains whose cause I did not find. On that RTX 3050 Laptop, after I switched the TD project to a version with more complex particle effects, StreamTurbo exited right after receiving the first frame over Spout, with no error message, and the Windows error log pointed to a Spout DLL. I did not keep investigating because I was short on time, and switching to NDI worked normally. If StreamTurbo closes as soon as it connects over Spout, try NDI first.
Development process
StreamTurbo was developed entirely by Claude Opus 5.5 with Matt Pocock Skills. Each feature was first written as a spec (a feature specification) in a GitHub issue, then split into tickets that can each be finished on their own. Four specs were split into 13 tickets. Eleven of them were implemented by the AI agent, and the other two were the hands-on reproduction and measurement I did on the 4 GB laptop. I later turned the workflow I used during development into Whetstone.
Summary
StreamTurbo suits people who want real-time AI video in TD without dealing with Python and CUDA versions. With an RTX 3070 at a 60% power limit, generating at 512×512 and enlarging to 2048×2048 with the Upscaler runs at about 21 fps, about 5 fps less than ordinary scaling, in exchange for clearer edges and texture.
- Pros: Installs with a double-click on
start.cmd, and deleting the folder removes everything. It has a built-in Upscaler and a TD sample component, and a 4 GB GPU can use TensorRT. - Cons: It supports only Windows and NVIDIA GPUs, and the only model is sd-turbo.
- Not yet verified: The speed on other GPU models, and the Engine build time on a 4 GB GPU.